Sunday, October 31, 2010

McCalls 6078 - ties added

I've now added ties to the neckline to stop them sliding off & giving people an unwanted flash, & they've sorted that issue out.
Have taken some photos of me wearing it, to give you a better idea of how nice this top is.


Also check out Erica B's top that she's just posted on her blog - Erica B.'s - D.I.Y. Style!  
Made in a sparkly fabric, it looks absolutely fabulous! (I think I need one just like it!)

Saturday, October 30, 2010

McCalls 6078 top

Well I finally received this pattern in the mail, having ordered it ages ago at http://www.sewingpatterns.com/. Lucky me, they had such a great sale it was out of stock so had to wait until they got some more in before posting it to me!
I bought it to make view A, as I love the draped neckline & the cap sleeve.

I ordered some fabrics on Ebay, from a seller in the US called Maria, whose store  is called "Best Online Fabrics" (bestonelinefabrics).
Gorgeous fabrics, but postage was a bit on the expensive side for me, due to me being in Australia, so I had to limit myself to just 2 pieces.
Maria was kind enough to include an extra piece at no charge, so I decided this would be my test fabric for this pattern.
the top went together easily, with no major dramas.
It was completed in under an hour in fact so will be a good pattern when I want instant results.

Because of the draping this is a very stylish & flattering design.(not that you'd know it looking at the photo on the model! it looks much nicer on)
My only issue with it is the shoulder line.

With the back being a cross-over V style, I found when wearing it, it was slipping off my shoulders all day (I wore it to work yessterday), & even though I hd put lingerie straps in it, my bra straps weren't enough to hold it up so they slipped off too.
My solution for this will be to add ties to hold it in place, which I will attach at the neck/shoulder seam (its in the washing machine at present so will do that once its dry).
Otherwise I love it.

I am thinking I will redraft the back pattern piece to have just a round neckline at the back (ie, 1 piece, no cross-over) for a top that's more suitable for work.
So for a test pattern, I'm really happy with this top, & once I add the ties, will wear it to death!

Saturday, October 23, 2010

It's Prom time!


Well I've been busy the last few weeks sewing up prom dresses for a friend's daughter.
Amelia had a fair idea of what she wanted so we took her shopping for fabric at my favourite store.
She picked 2 fabrics that her mother & I would never have picked for her in a million years!
Yes, we were only going to make one dress, but the fabric was such a great price & she couldn't decide which one she liked more, so I said, why not get both?
(its not as if a 17yo wouldn't get the use out of them when maxi-dresses are all the rage this season).
She ended up with a cream stretch satin with a large floral design in chocolate brown & olive green,


and a zebra stripe crinkle chiffon, cream with dark brown/black stripes.


A fine tricot knit in cream was used to line both dresses.

We decided to use Simplicity 4577 for both dresses, as she liked the shape of the skirt & there were a few options for the bodice. (I bought this pattern at least 5 yrs ago & never made it until now! It appears it's still available to buy on http://www.simplicity.com/ , but I wouldn't wait too long if its something you'd like to try!)


For the zebra stripe chiffon, she chose view C. It was made to the pattern, with 2 variations.
The front seam was eliminated (not really sure why there was a seam here as there was minimal shaping),  & the back darts were eliminated.
The bodice on this view has a nice twist top overlay, & a sash that is attached under the twist front.
As the chiffon was so transparent, I underlined the bodice pieces with the tricot lining fabric before attaching the twist pieces.


For the cream stretch satin, she chose view A, without the gathered band & without the sash.
I again eliminated the front seam, as I wanted a smooth look, but this time I sewed the back darts.
I also added ties to the halter, & shortened the pattern 2 inches to accomodate the ties.
I understitched the bodice as far as I could on both sides, & made the lining about 1/4" smaller to allow for the stretchiness of the lining & to prevent the lining rolling to the outside.
Unfortunately this was not enough & it kept rolling out on the V-neck, which really ruined the look of the dress.
To fix this, I found some olive green seed beads in my beading supplies, & hand-stitched them around the V-Neck & across the front under-bust seam approx 1/8" away from the edge/seam.
This looked really nice & has done what I was hoping it would.


As she is a similar size to me I have been able to check the fit as I go by trying it on myself.
I'm just waiting for her to come by for her final fitting so I can mark the invisible zipper placements & hems on both dresses, & then they'll be done.
Here are the dresses, pinned on the model, ready for the final fitting.

I'm really happy with how they both turned out, & am now busting to make one (or more!) for myself, now that I've seen how nicely this patern looks on.
I'm not sure which one Amelia will choose to wear for her prom, but they will be great summer party dresses as well...
And what  great excuse to use up some of my stash to make a few of my own!
photo album link if you want to see larger photos.

Wednesday, October 6, 2010

Apple cream slice

Hello again.

as a change from a sewing report, I thought I'd share a recipe given to me today by one of my friends at work, Melissa.

She made this gorgeous Apple Cream Slice & brought it in to share, & it was so yummy, that we all begged her to shared the recipe.

So when I got home this arvo, what did I find in my in-box, but the said recipe, sent to me from Melissa!
Thank you Melissa!

As Melissa was happy to share, I thought I'd pass it on to my sewing friends (with appropriate US/UK conversions) - enjoy!


Melissa's Apple Cream Slice


1 cup self raising flour (or 1 cup all purpose flour + 1 1/2 tspns baking powder)

1 cup desiccated coconut

1/2 cup caster sugar (superfine)

125g/4oz butter melted (1 stick, roughly)

1 tspn vanilla essence

250g/8oz tub sour cream

420g /14oz can sliced pie apples, drained

1 tblspn cinnamon sugar (an AU tablesooon is 20ml, & a US/UK tablesooon is 15ml)


1. Preheat oven to moderate, 180C/350F. Line a 16 x 26cm (6" x 10") slice pan (1" deep) with baking paper.

2. In a large bowl, combine flour, coconut & sugar. Pour in butter & vanilla, stirring until combined. Press firmly into pan.

3. Bake 10-15 mins, until lightly golden. Allow to cool slightly.

4. Spread sour cream over base. Top with apple slices. Sprinkle with cinnamon sugar. Bake for 10-15 mins, until lightly golden. Cut into squares & serve warm or cold.

Now tell me that isn't good!

Sunday, October 3, 2010

Beautiful Blogger Award

I was nominated for this award ages ago by Myra of Simple Inspirations, but being new to this blogging stuff (& having been totally slack & not even updating my blog for several months), didn't even know Myra had given it to me until recently.
So thank you very much Myra!
Now apparently their are 2 rules for this award, the first one being to divulge 10 things that you don't know about me.

This theoretically shouldn't be too difficult seeing as none of you actually 'know' me yet!
The other rule for this award is to pass it on to 5 other deserving recipients.
I doubt I'll have any difficulty with that rule either!
So here we go....

  1. I was born in Bundaberg, Australia, & grew up on my Dad's sugar cane farm, when he not only grew sugar cane, but also watermelons, rockmelons (canteloupe), corn, tomatoes grean beans, & anything else that took his fancy (in market quantities). I didn't wear shoes until I went to high school, & it was quite common to come home from school & find a huge snake or some other nasty there to greet me! Life on a farm was fun!
  2. I have lived in quite a few places, including overseas. When I grew up & left home I moved to Brisbane for a few years, then to Adelaide, before jetting overseas to live in Stockholm, Sweden (twice), Hamburg (Germany) & Vancouver (Canada). I'm now back in Brisbane, having been here for the last 10 years (gosh how time flies!) & now have itchy feet & am wanting to travel again!
  3. Whilst living in Sweden I learned to speak Swedish, & and although not what you'd call fluent, I could hold my own in a coversation. Sadly after 10 years I have forgotten alot of it.
  4. I like to play squash, & up until recently was playing mens (low) A grade, until several injuries forced me to take a break. 12 months & several kilos later I think it might be time for me to get out the gear again & see if I can still run around the court like I used to!
  5. I have 3 children, 2 of them born in Canada. James (15), has aspergers, so is a bit of a handful. At 6ft2" I'm quite the midget next to him. Kelsey (13) is similarly ginormous, already towering above me at 5ft9" & not showing any sign of slowing down. William (8), my baby, is the cheekiest of the 3, & the only one born in Australia.
  6. I learned to sew when I was a kid, starting when I was about 6yrs old handsewing stuff & making dolls clothes, progressing to clothes for me & using my Mum's sewing machine when I was 9 or 10 yrs old. Those first few things were pretty dodgy, let me tell you, but I kept persisting! My mum never really had any time to teach me as such, but she did let me use her precious Husqvarna machine & allow me to use up her fabric stash from an early age, & I basically taught myself to sew, occasionally pestering her if I really couldn't figure something out. This love of sewing has grown into the addiction it is today, & its what I spend most of my $$ on time on!
  7. My Dad had a beautiful singing voice, & used to perform in the local amateur players group & sing in concerts quite regularly. He sang Amazing Grace at my wedding in 1987, & I think he was very proud that I asked him to sing on that day. (I can kinda sing too, but not nearly as well as my Dad could.)
  8. My Mum & Dad were born on the same day, only 5 years apart. My son James was also born on their birthday, being 10 days past his due date. I named him after my Dad (also called James, but he was known as Jim to everyone) & it was the only time in his life that my Dad was speechless!
  9. Ikea is my faourite furniture store, & was long before I went to Sweden to live!
  10. I am a Cancerian, very true to form too. I love my kids, cooking, & sewing of course, & my home is my castle (hate housework though - would love a maid!) I am a fairly quiet & shy person, only coming out of my shell once I get to know you.
Ok, that was more difficult than I thought it would be. I obviously lead a very boring life!
Now to the 5 deserving recipients....
  1. The first would have to go to Peter of Male Pattern Boldness, as he's only been sewing for just over a year now & has been turning out some incredibly amazing things! I am totally impressed with his efforts, & I think if he's this awesome now, what's he going to be like in another year or two?
  2. The second would have to go to Shannon of Mushywear, as we seem to have similar tastes in what we like to sew. And she lives in Hawaii, which is where I want to visit next!
  3. The third would be for Eugenia, of Eugenia's (fabulous) world of fashion, who tells us she's fairly new to sewing also, but has been turning out some amazing things! I particularly like her Jalie scarf collar top that she finished a few days agao, the colour is marvellous on her.
  4. Number 4 would definitely be for Erica of Erica B's - D.I.Y. Style. She is an accomplished seamstress with a love of classic style, & turns out some stunning pieces.
  5. And last but not least, number five would be for Sherry of Patterns ~ Scissors ~ Cloth, as she has some awsome "tricks of the trade" tips on her blog, and does some beautiful work too (check out A gown for Christine - WOW!)
So there you have it.
I really appreciated Myra giving me this award, & am very happy to be passing it on to 5 lovely people who I wouldn't have otherwise 'met' but for the wonderful world of blogging!


Simplicity 2443 jacket & New Look 6597 skirt

Hi again.
Sunday's sewing session started early today, when I woke up at 5am.
My sewing room is at the opposite end of the house to the bedrooms (a deliberate design!) so when I wake up early (which is more often that not) I go do some sewing.
I've had Simplicity 2443 jacket & New Look 6597 skirt cut out & ready to go for a month or so now, & today I decided it was time to make them up.
The fabric is a fairly heavy stretch twill with an embroidered floral design all over it, in a lovely terracotta/rust red colour. For some reason though it photographed as coral.
I had barely enough fabric to get both out (I think I had 3m?) but with a bit of manouvring, managed to get it all cut, with tiny scraps only left over.
The skirt came together quickly, I've made this one heaps of times before.
Although this pattern is now out of print, it was available up until recently as a download from http://www.printsew.com/.
Sadly, it doesn't appear to be available there any more, so if you want one, you might be lucky enough to find one on Ebay, Etsy etc....

As you can see from the pattern pieces, it has interesting seam lines, & is a quick skirt to sew. I made another one of these recently as part of my 10 piece wardrobe plan for the http://www.patternreview.com/ wardrobe competition.
I used self bias on the waistline, for a nicer finish.
Sadly the photo does not show off what a nice skirt pattern this is.


After breakfast, it was on to the jacket.
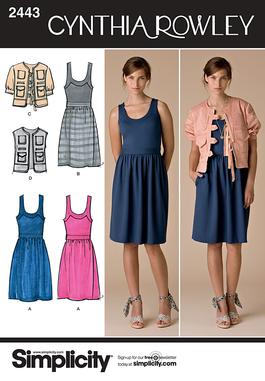
2443Line Drawing

This is a Cynthia Rowley pattern, & quite honestly, I think the dress is absolutely ghastly!
But the jacket? Well that is mega cute.
Heaps of people have reviewed it on http://www.patternreview.com/ already, so I decided I'd also have a go.

Did I mention this fabric was a bit too heavy for this pattern?
It came together well, but I managed to break 4 heavy duty needles when topstitching the sleeve cuffs.
I don't normally topstich 1/4" away from the edge on pockets (a look I don't normally go for) but I deviated from my usual practise & decided to do what the instructions said for a change.
Also, I couldn't find the right colour D-rings for the sleeve cuffs, so decided I'd use a jeans button instead.
(I'vegot some bronze rivets & jeans buttons to put on, but do you think I could find bronze D-rings??)
This of course required modifying the sleeve cuff to suit (I used the same markings of course to attach, but chopped off the extensions)...
BUT, I was so focused on whether I was going to have enough thread to finish the jacket or not, that I forgot to measure the length of the sleeve cuff before fitting it on!
And boy, what a mistake that turned out to be.
Lets just say I must have REALLY FAT arms, as there's no way on EARTH that I'll even be able to do these up!
So I've put it on the dummy for now, taken a few photos, while I mull over how I'm going to save this.
Because apart from the sleeve stuff-up, I LOVE the jacket & really want to be able to wear it.
My thoughts at this stage, are to unpick the sleeve tab & cut off the sleeve at that level, & do an elastic casing.
ONLY because I just don't have enough fabric left to cut more cuffs (which would be my preferred option).
My other option would be to use the strip of bias I have left over from the skirt waistband to try & rig something up, but am not sure I have enough to do that....
Any suggestions would be most appreciated!
Anyway, here's the finished jacket, tell me what you think.


PS. I'd like to give this pattern one more try. (this time with a properly sized sleeve cuff!)

I've got some royal blue linen left over from another dress made recently, so may try it in that.
Hopefully it will be easier to topstitch than this jacket was!

Saturday, October 2, 2010

and another one!

Well this arvo I decided to sew up another dress I cut out a few weeks ago.
This time it was a pattern from the Knip Mode magazine that I discovered recently (thank you Crafty Mamas! http://www.craftymamas.com.au/ ).

I had already made on version up in a black dry knit with a small floral, & at the same time I cut that one out, I cut another in a coral coloured textured lycra.
This was actually supposed to be the practice dress, but cest la vie!
I made a wasitband on this one, but made it detachable (I left it off the black dress).
I also corrected the very low V-neck by stitching the collar together at a more decent level!

Overall I'm quite happy with how this one turned out too.
Have taken a few photographs with some more of my glam shoes from Shoesbuys (yes I do have another pair of floral satin shoes in a darker colourway - I couldn't decide between the 2 so bought them both!)
Enjoy!

Another weekend, another dress......

Hi again.
Well I've recovered from my last effort at posting now, so here I am ready to try again!

This morning I woke up early & decided I'd make my loud floral dress I cut out a few weeks ago....
Its a cotton satten print in a beautiful bold hawaiien type print (well I think so anyway) that I fell in love with a few years ago & have never been able to decide what to make it in until now.
I used New Look 6909, deciding it would show off the floral nicely whilst giving a nice shape, & allow me to trial the scoop neckline.


I've made this dress once before, making view C, without the pockets (not by choice!).
This was made up in a nice checked suiting-weight stretch something or other, & turned out very nicely.
Every time I wear this I get great comments, even from strangers, so I figure it must be a flattering style!


So out came this pattern again, this time to trial the scooped neckline - view E.

Now there's a story behind making this dress.
I actually plan on making another dress in some pale turquoise blue/green linen/rayon from the stash, as I bought these fantastic shoes on Ebay that are to die for, & needed the perfect dress to show them off.
How cool are these?

(these guys have their own web-site too - http://www.shoesbay.com.au/, so if you want to be tempted by some gorgeous shoes, go take a look!)

The linen/rayon from my stash is the exact same colour as the background colour on theses shoes.....

So anyway, I wanted a fairly simple style to show off the shoes, so decided the scoop neck style might be nice.
But not wanting to chop into this fabric & risk wasting it (as available quantity was an issue), I decided to make it up in another fabric first.
Rummaging thru the stash, I came across the gorgeous hawaiien floral sateen, & decided why not?

As per the previous dress I made, after comparing my measurements to those printed on the pattern, I decided the ease in the hips was ridiculous, so tapered down a size in the hip area.
This dress came together very quickly, & has confirmed that the scooped neckline is a winner.
I only lined the sleeves, as this fabric doesn't need a full lining, but for the turquoise dress a full lining will be a must otherwise I'll be a crinkled mess in no time! (& we can't have that!)
so here is the finished result, I will probably wear this to work now that summer is on its way (& sitting down all day means a dress in a stretch fabric is more comfortable) or out shopping on weekends.


As a variation, I tied a chiffon sash under the bust area, which gave it a completely different look, all girly & feminine. I quite like this look too, & would wear it this way when going out with the girls...


So there you have it, my Saturday morning sewing effort, & as a bonus, I managed not to delete everything I wrote!